Thursday, December 17, 2009
What is Active Directory?
Active Directory is a network-based object store and service that locates and manages resources, and makes these resources available to authorized users and groups. An underlying principle of the Active Directory is that everything is considered an object—people, servers, workstations, printers, documents, and devices. Each object has certain attributes and its own security access control list (ACL).
How do you get to Internet Firewall settings
Start –> Control Panel –> Network and Internet Connections –> Network Connections.
What do you do if earlier application doesn’t run on Windows Server 2003
When an application that ran on an earlier legacy version of Windows cannot be loaded during the setup function or if it later malfunctions, you must run the compatibility mode function. This is accomplished by right-clicking the application or setup program and selecting Properties –> Compatibility –> selecting the previously supported operating system.
What are the accessibility features in Windows 2000
StickyKeys,
FilterKeys Narrator,
Magnifier,
On-Screen Keyboard.
FilterKeys Narrator,
Magnifier,
On-Screen Keyboard.
what is folder sharing? Explain hidden sharing and open sharanig How can i assign that?
Folder Sharing:--> The folder sharing means we can access
the files & Folders of other computer in our computer
without access the Desktop & Drives.
Hiden Sharing:--> The hiden sharing means we share the
drive with Sign $ & we can't see the drive in Network.
Open Sharing:--> The Open sharing means we can see the
drive in Network.
the files & Folders of other computer in our computer
without access the Desktop & Drives.
Hiden Sharing:--> The hiden sharing means we share the
drive with Sign $ & we can't see the drive in Network.
Open Sharing:--> The Open sharing means we can see the
drive in Network.
What are the advantages of using DLL’s
DLLs are run-time modular. DLL is loaded when the program needs it. Used as a code sharing between executables.
What is a deadlock
A deadlock, very simply, is a condition in which two or more threads wait for each other to release a shared resource before resuming their execution. Because all threads participating in a deadlock are suspended and cannot, therefore, release the resources they own, no thread can continue, and the entire application (or, worse, more than one application if the resources are shared between threads in multiple applications) appears to hang.
The differences between Windows 95 and Windows NT
Lack of Unicode implementation for most of the functions of Win95. Different extended error codes. Different number window and menu handles. Windows 95 implements some window management features in 16 bits. Windows 95 uses 16-bit world coordinate system and the coordinates restricted to 32K. Deletion of drawing objects is different. Windows 95 does not implement print monitor DLLs of Windows NT. Differences in registry. Windows 95 does not support multiprocessor computers. NT implementation of scheduler is quite different. Different driver models. Win95 was built with back-compatibility in mind and ill-behaving 16-bit process may easily corrupt the system. Win95 starts from real DOS, while WinNT uses DOS emulation when one needs a DOS. Win95’s FAT is built over 16-bit win3.1 FAT (not FAT32!, actually, Win95’s FAT contains two FATs).
The difference between local, global and universal groups
Domain local groups assign access permissions to global domain groups for local domain resources. Global groups provide access to resources in other trusted domains. Universal groups grant access to resources in all trusted domains.
What is presentation layer responsible for in the OSI model
The presentation layer establishes the data format prior to passing it along to the network application’s interface. TCP/IP networks perform this task at the application layer.
What is Windows 2000 Server
Windows 2000 Server is the latest operating system for server developed by Microsoft. It's the new version of Windows NT Server. The new Windows 2000 Server was built on NT technology. The interface of the software is similar to that of Windows 95/98. It's gaining market share due to the ease of use.
How can I limit the number of allowed concurrent sessions per user in an Active Directory (AD) domain?
http://download.microsoft.com/download/f/d/0/fd05def7-68a1-4f71-8546-25c359cc0842/limitlogin.exe.
The tool stores logged-on information in a custom AD partition (dc=limit login, dc=, dc=; e.g., dc=limitlogin,dc=savilltech,dc=com) via a Microsoft IIS 6.0 (Windows Server 2003) hosted Web service, a client component, and a logon and logoff script.
After you download the file, extract the setup files to a folder you specify. The full configuration requires a change to the AD forest schema to allow extra detail about the logon status to be stored, and because an AD application partition is being created, the system must have at least one Windows 2003 domain controller (DC).
(i)To install Limit Login, perform these steps:
1.Use the Add/Remove Programs Control Panel applet to install IIS and ASP.NET on the
server that will act as the Limit Login Web service host (Add/Remove Programs -
Windows Components - Application Server).
2.Enable ASP.NET as an extension via the Internet Information Services (IIS) Manager
in the Web Service Extensions navigation pane. Ensure that the ASP.NET extension
is shown as Allowed in the detail pane, as the figure shows.
3.Execute the LimiLoginIISSetup.msi from the extraction folder to begin setup of the
Web service portion of limit login. (You must be logged on as an Administrator.)
Click Next to the welcome dialog box.
4.You'll be prompted to enter a virtual directory name that the Web service will use
and the port (you can usually leave the default settings for these) and click
Next.
5.Click Next, then click Close to complete the Web portion of the setup. If you look
at IIS Manager, you'll see a new WSLimitLogin directory under the Default Web
Site.
6.To prepare AD, execute the LimitLoginADSetup.msi file and click Next at the
introduction screen.
7.Click "I Agree" to the license agreement and click Next.
8.Select the installation folder (the default is C:\program files\limit login), and
click Next.
9.The AD setup will prompt you to prepare the forest and domain and install the MMC
Limit Login snap-in, as the figure shows. Click Next. (You must be logged in as a
Schema Admin at this point and have the Schema Master FSMO available.
10.The installation will prompt you to ensure that you have sufficient permissions
to write to the schema. Click OK.
11.You'll see a dialog box that shows that the changes completed successfully for
the forest portion (the schema change) of the setup. Click OK.
12.Specify the name of the IIS server and a folder in which the scripts can be
stored, as the figure shows. You must have already created the share (it can be
hidden), and make sure authenticated users have read access to the share. Click
Next.
13.Select the DC (must be Windows 2003) that will host the application partition for
Limit Login, as the figure shows. Click Next.
14.You can now enter credentials used to create the partition or clear the "Use the
following credentials" check box if your logged on user has sufficient
credentials. Click Create.
15.Click OK to the successful creation message.
16.You now need to manually copy the LimitLogin.wsdl, llogin.vbs and llogoff.vbs
from the C:\program files\limit login\scripts folder to the share you specified
in step 12. In the Final Steps message box, select the "I've read the
instructions and will perform these steps manually" checkbox, as the figure
shows. Click Next.
17.Click Close.
(ii)You now need to deploy the LimitLogonClientSetup.msi to the machines in your environment via a logon script, Group Policy, or Microsoft Systems Management Server (SMS) because this installation file contains the client-side piece that communicates with the IIS-based Web service.
You also need to configure Group Policy to execute the llogin.vbs and llogoff.vbs scripts.
You can do this at domain level by performing these steps:
1.Create a new Group Policy Object (GPO) called "Limit Logon" and link it at a
domain level, as the figure shows. (Open the Active Directory Users and Computers
MMC snap-in, right-click the domain level, and select Properties. Select the Group
Policy tab and click New. Enter a name of Limit Logon.)
2.Click Edit on the Policy tab to open Group Policy Editor (GPE).
3.Navigate to the User Configuration - Windows Settings - Scripts (Logon/Logoff)
branch.
4.Double-click Logon in the right pane and click Add.
5.Enter the script name and location from the share ( e.g., \\savdaldc01
\limitlogon$\llogin.vbs) and click OK.
6.Double-click Logoff in the right pane and click Add.
7.Enter the script name and location from the share (e.g., \\savdaldc01
\limitlogon$\llogoff.vbs) and click OK.
8.Close GPE.
This process creates in the C:\program files\limitlogin folder the LimitLoginMMCSetup.exe utility, which, when run, integrates Limitlogin directly into the AD Users and Computers snap-in, providing a new Limitlogin Tasks context-menu option. This option opens the LimitLogon configuration for the user, which displays the current sessions, as the figure shows. (You'll need Limitlogin installed on each machine that runs Active Directory Users and Computers. To do so, execute the LimitLoginADSetup.msi file and during the setup options, select the "Install Limitlogin Active Directory MMC snap-in integration tools on this machine" option).
Click Configure to set the number of logons allowed, as the figure shows.
Limitlogin also provides a script--Bulk_LimitUserLogins.vbs--that lets you define quotas for all users in the domain. If you want to use this tool simply to see logged-on sessions, give users a high quota limit (without quotas enabled no user-session tracking occurs) that they'll never reach.
Any attempt to log on more than the allowed number of sessions will result in the user being logged off and an event ID 8811written to the Application event log of the LimitLogon server, as the figure shows.
Read the Help file that accompanies the Limitlogin tool. It has a lot of details about using the tool. Also be aware that some antivirus and antispyware packages might try to block the scripts from running so you need to configure the programs to allow the scripts to run.
Configuring the WSUS Client by Group Policy
The quickest and easiest way to configure systems to auto-update using Windows Server Update Services (WSUS) is to use group policy within Active Directory. This document assumes familiarity with using "Active Directory Users and Computers" to manage group policy.
The client PCs need to be running Windows 2000 SP4, Windows XP SP2, Windows Server 2003 (SP1 or above) or Windows Vista. (Technically this product works with the previous SPs, but we have decided not to approve the full service pack updates for installation as support staff may not wish SP updates to be approved automatically. Some PCs will fail with these updates, e.g. if free hard disk space is too small. In any case you should not be connecting systems with earlier SPs than those listed above to the network. MS does not provide update support for these SPs.)
First, select the Organisational Unit (OU) to which you wish to apply the policy. Then choose an existing Group Policy Object (GPO) to which you wish to add the Auto Update configuration, or alternatively create a new GPO. Open the GPO.

Under Computer Configuration, right-click on Administrative Templates and choose Add/Remove Templates....

You will see a dialog box that looks something like this:

We need to add a new template containing the WSUS settings, so click Add....

We need to add wuau.adm. This may or may not already be present in the \windows\inf folder. If it is present, please check its size. If it is less than 49kB, it's an old version. The newer version of wuau.adm, can be downloaded from here (Windows Policy Template, 50KB) and saved to \windows\inf.
You should now see the wuau.adm template included in the list. Here it's listed with the smaller size (49kB, as opposed to 50kB). Again, if wuau.adm shows up as smaller, you have the wrong version.

Next, expand the tree to get to Computer Configuration/Administrative Templates/Windows Components/Windows Update. Under Windows Update, you should see fifteen policy setting, as shown below. If you only see only two or four, you have loaded an old version of wuau.adm.

Next, expand the tree to get to Computer Configuration/Administrative Templates/Windows Components/Windows Update. Under Windows Update, you should see fifteen policy setting, as shown below. If you only see only two or four, you have loaded an old version of wuau.adm.

This document explains the minimum configuration required to use WSUS; for more information on the other settings, read the description provided by Windows.
We'll start at the top. Double-click on Configure Automatic Updates.
In Configure Automatic Updates Properties, choose Enabled. Choose "4. Auto download and schedule the install"; select an installation day (either "every day", or choose the day of the week on which you'd like updates to take place); select an installation time (the default is 3am; we recommend that you schedule updates for a time when no one is likely to be using the computer, even if you'd expect the computer to be switched off at that time). Click on OK to close the dialog box.

Open the setting Specify intranet Microsoft update service location. In the properties dialog, choose Enabled. Then, set both the intranet update service and the intranet statistics server to http://is-wsus.bris.ac.uk/ as shown below. Click on OK to close the dialog box.

This version of WSUS can be set to update Microsoft Office packages (Office XP(2002), 2003, 2007) in addition to Windows itself. This is optional and will not happen unless you select it as follows. If you wish to use WSUS to keep Microsoft Office packages (Office XP(2002), 2003, 2007) updated, you can configure the WSUS client to install Office updates as follows (provided that Office was installed from an unpatched original copy): Open the setting Enable client-side targeting. In the properties dialog, choose Enabled. Then, set the target group name OfficeUpdates as shown below. Click on OK to close the dialog box.

Open the setting Reschedule Automatic Updates scheduled installations. In the properties dialog, choose Enabled. Leave the Wait after system startup setting at five minutes. We suggest that if you do decrease this amount, you set it to no less than two minutes. Click on OK to close the dialog box.

Open the setting No auto-restart for scheduled Automatic Updates installations. In the properties dialog, choose Enabled. This will prevent the computer from restarting automatically after performing updates (and will avoid work being lost).
Open the setting Allow Automatic Updates immediate installation. In the properties dialog, choose Enabled. This will allow the computer to silently install updates that do not interrupt services or require a reboot.

The settings above should allow your computers to automatically stay up to date with security patches and minimise the risk of work being lost.


DHCP server in Windows 2003
The DHCP server assigns a client an IP address taken from a predefined scope for a given amount of time. If an IP address is required for longer than the lease has been set for, the client must request an extension before the lease expires. If the client has not requested an extension on the lease time, the IP address will be considered free and can be assigned to another client. If the user wishes to change IP address then they can do so by typing "ipconfig /release", followed by "ipconfig /renew" in the command prompt. This will remove the current IP address and request a new one. Reservations can be defined on the DHCP server to allow certain clients to have their own IP address (this will be discussed a little later on). Addresses can be reserved for a MAC address or a host name so these clients will have a fixed IP address that is configured automatically. Most Internet Service Providers use DHCP to assign new IP addresses to client computers when a customer connects to the internet - this simplifies things at user level.

The above diagram diplays a simple structure consisting of a DHCP server and a number of client computers on a network.
The DHCP Server itself contains an IP Address Database which holds all the IP addresses available for distribution. If the client (a member of the network with a Windows 2000 Professional/XP operating system, for example) has "obtain an IP address automatically" enabled in TCP/IP settings, then it is able to receive an IP address from the DHCP server.

Setting up a DHCP Server :
This will serve as a step-by-step guide on how to setup a DHCP server.
Installing the DHCP server is made quite easy in Windows 2003. By using the "Manage your server" wizard, you are able to enter the details you require and have the wizard set the basics for you. Open to "Manage your server" wizard, select the DHCP server option for the list of server roles and press Next.
You will be asked to enter the name and description of your scope.
Scope: A scope is a collection of IP addresses for computers on a subnet that use DHCP.

The next window will ask you to define the range of addresses that the scope will distribute across the network and the subnet mask for the IP address. Enter the appropriate details and click next.

You are shown a window in which you must add any exclusions to the range of IP addresses you specified in the previous window. If for example, the IP address 10.0.0.150 is that of the company router then you won't want the DHCP server to be able to distribute that address as well. In this example I have excluded a range of IP addresses, 10.0.0.100 to 10.0.0.110, and a single address, 10.0.0.150. In this case, eleven IP's will be reserved and not distributed amongst the network clients.

It is now time to set the lease duration for how long a client can use an IP address assigned to it from this scope. It is recommended to add longer leases for a fixed network (in the office for example) and shorter leases for remote connections or laptop computers. In this example I have set a lease duration of twelve hours since the network clients would be a fixed desktop computer in a local office and the usual working time is eight hours.

You are given a choice of whether or not you wish to configure the DHCP options for the scope now or later. If you choose Yes then the upcoming screenshots will be of use to you. Choosing No will allow you to configure these options at a later stage.

The router, or gateway, IP address may be entered in next. The client computers will then know which router to use.

In the following window, the DNS and domain name settings can be entered. The DNS server IP address will be distributed by the DHCP server and given to the client

If you have WINS setup then here is where to enter the IP Address of the WINS server. You can just input the server name into the appropriate box and press "Resolve" to allow it to find the IP address itself.

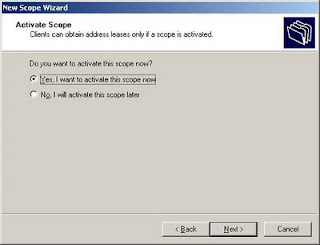
The last step is to activate the scope - just press next when you see the window below. The DHCP server will not work unless you do this.
The DHCP server has now been installed with the basic settings in place. The next stage is to configure it to the needs of your network structure.
Configuring a DHCP server
Hereunder is a simple explanation of how to configure a DHCP server.
The address pool displays a list of IP ranges assigned for distribution and IP address exclusions. You are able to add an exclusion by right clicking the address pool text on the left hand side of the mmc window and selecting "new exclusion range". This will bring up a window (as seen below) which will allow you to enter an address range to be added. Entering only the start IP will add a single IP address.

DHCP servers permit you to reserve an IP address for a client. This means that the specific network client will have the same IP for as long as you wanted it to. To do this you will have to know the physical address (MAC) of each network card. Enter the reservation name, desired IP address, MAC address and description - choose whether you want to support DHCP or BOOTP and press add. The new reservation will be added to the list. As an example, I have reserved an IP address (10.0.0.115) for a client computer called Andrew.

If you right click scope options and press "configure options" you will be taken to a window in which you can configure more servers and their parameters. These settings will be distributed by the DHCP server along with the IP address. Server options act as a default for all the scopes in the DHCP server. However, scope options take preference over server options.
In my opinion, the DHCP server in Windows 2003 is excellent! It has been improved from the Windows 2000 version and is classified as essential for large networks. Imagine having to configure each and every client manually - it would take up a lot of time and require far more troubleshooting if a problem was to arise. Before touching any settings related to DHCP, it is best to make a plan of your network and think about the range of IPs to use for the computers.

The above diagram diplays a simple structure consisting of a DHCP server and a number of client computers on a network.
The DHCP Server itself contains an IP Address Database which holds all the IP addresses available for distribution. If the client (a member of the network with a Windows 2000 Professional/XP operating system, for example) has "obtain an IP address automatically" enabled in TCP/IP settings, then it is able to receive an IP address from the DHCP server.

Setting up a DHCP Server :
This will serve as a step-by-step guide on how to setup a DHCP server.
Installing the DHCP server is made quite easy in Windows 2003. By using the "Manage your server" wizard, you are able to enter the details you require and have the wizard set the basics for you. Open to "Manage your server" wizard, select the DHCP server option for the list of server roles and press Next.
You will be asked to enter the name and description of your scope.
Scope: A scope is a collection of IP addresses for computers on a subnet that use DHCP.

The next window will ask you to define the range of addresses that the scope will distribute across the network and the subnet mask for the IP address. Enter the appropriate details and click next.

You are shown a window in which you must add any exclusions to the range of IP addresses you specified in the previous window. If for example, the IP address 10.0.0.150 is that of the company router then you won't want the DHCP server to be able to distribute that address as well. In this example I have excluded a range of IP addresses, 10.0.0.100 to 10.0.0.110, and a single address, 10.0.0.150. In this case, eleven IP's will be reserved and not distributed amongst the network clients.

It is now time to set the lease duration for how long a client can use an IP address assigned to it from this scope. It is recommended to add longer leases for a fixed network (in the office for example) and shorter leases for remote connections or laptop computers. In this example I have set a lease duration of twelve hours since the network clients would be a fixed desktop computer in a local office and the usual working time is eight hours.

You are given a choice of whether or not you wish to configure the DHCP options for the scope now or later. If you choose Yes then the upcoming screenshots will be of use to you. Choosing No will allow you to configure these options at a later stage.

The router, or gateway, IP address may be entered in next. The client computers will then know which router to use.

In the following window, the DNS and domain name settings can be entered. The DNS server IP address will be distributed by the DHCP server and given to the client

If you have WINS setup then here is where to enter the IP Address of the WINS server. You can just input the server name into the appropriate box and press "Resolve" to allow it to find the IP address itself.

The last step is to activate the scope - just press next when you see the window below. The DHCP server will not work unless you do this.

The DHCP server has now been installed with the basic settings in place. The next stage is to configure it to the needs of your network structure.
Configuring a DHCP server
Hereunder is a simple explanation of how to configure a DHCP server.
The address pool displays a list of IP ranges assigned for distribution and IP address exclusions. You are able to add an exclusion by right clicking the address pool text on the left hand side of the mmc window and selecting "new exclusion range". This will bring up a window (as seen below) which will allow you to enter an address range to be added. Entering only the start IP will add a single IP address.

DHCP servers permit you to reserve an IP address for a client. This means that the specific network client will have the same IP for as long as you wanted it to. To do this you will have to know the physical address (MAC) of each network card. Enter the reservation name, desired IP address, MAC address and description - choose whether you want to support DHCP or BOOTP and press add. The new reservation will be added to the list. As an example, I have reserved an IP address (10.0.0.115) for a client computer called Andrew.

If you right click scope options and press "configure options" you will be taken to a window in which you can configure more servers and their parameters. These settings will be distributed by the DHCP server along with the IP address. Server options act as a default for all the scopes in the DHCP server. However, scope options take preference over server options.
In my opinion, the DHCP server in Windows 2003 is excellent! It has been improved from the Windows 2000 version and is classified as essential for large networks. Imagine having to configure each and every client manually - it would take up a lot of time and require far more troubleshooting if a problem was to arise. Before touching any settings related to DHCP, it is best to make a plan of your network and think about the range of IPs to use for the computers.
Subscribe to:
Comments (Atom)